| Back to Back Issues Page |
 |
|
LCB, Issue #040 --, Hit Hard with a Kingside Attack September 01, 2018 |
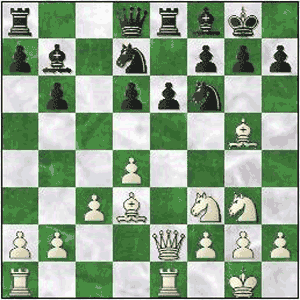
Hit Hard with a Kingside AttackLapoc Chess Board, Issue #040 -- GOTM #9 learn and play online chess Welcome to Thessaloniki, Greece. The year is 1988. Your two gladiators, Hoi and Gulko, quickly develop and settle in for a positional arm wrestle, perhaps... Many games are tight intractable struggles that are not decided until late into a difficult, long drawn out endgame. But that is not what is in store here. The slow-burning gameplan of building on small advantages and winning the endgame is discarded in favor of a more rapid approach. A Kingside Attack is launched with the intention of winning in the middlegame. Some ingenious sacrifices open up the unfortunate King and an inspired final thrust settles the matter. Hit Hard with a Kingside AttackHoi, Carsten - Gulko, Boris F [C43]GotM #9 - Thessaloniki, 1988 1.d4 e6 2.Nf3 c5 3.e3 Nf6 4.Bd3 b6 5.0-0 Bb7 6.Nbd2 cxd4 Black gets his central majority. 7.exd4 Be7 8.Re1 0-0 9.c3 d6 10.Qe2 Re8 11.Nf1 Nbd7 12.Ng3 Bf8 13.Bg5
After the opening both Kings look pretty safe. How to unlock the defense? 13...h6 14.Bd2 Qc7 15.Bc2 Bd5 16.b3 Qb7 Threatening to double the pawns by taking on f3. 17.Nh4 b5 18.Qd3 g5 White induces this weakening move from Black as he tries to drive away the Knight. 19.Nf3 The Knight can return, his
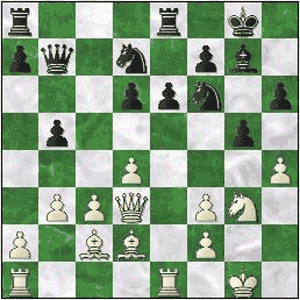
mission complete. (19.Ng6 would not have done anything for White's cause as any illusory initiative gained from the sacrifice would quickly fizzle out: 19...fxg6 20.f3 (20.Qxg6+ Bg7-+) 20...Bg7 21.c4 Bc6 22.Qxg6 Qb6 23.Be3 Qa5 24.f4 g4 25.d5 Nf8) 19...Bxf3 20.gxf3 Bg7 21.h4!?
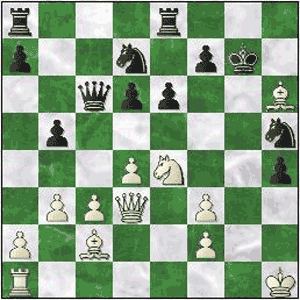
White gets rid of the cover in front of his own King in order to open lines of attack against the enemy King. It's a gamble, will it pay off? 21...gxh4 (21...b4 is not as strong as the text move, Black's stronghold will be breached anyway: 22.hxg5 hxg5 23.c4 Qb6 24.Bxg5 e5 25.Be3) 22.Ne4 Qc6 23.Kh1 Nh5 24.Rg1 Kf8 25.Rxg7! The exchange sac takes out one of Black's main defenders. 25...Kxg7 (Maybe 25...Nxg7 would have served him better with 26.Bxh6 answered by 26...f5 27.Bxg7+ Kxg7 28.Rg1+ Kf7 29.Ng5+ Ke7 30.Nxe6 Rg8 31.Re1 d5 32.Nf4+ Kd8 33.Re6) 26.Bxh6+!
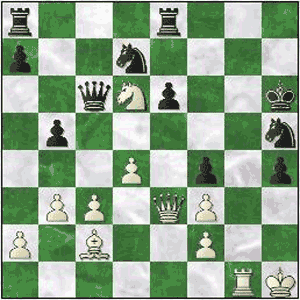
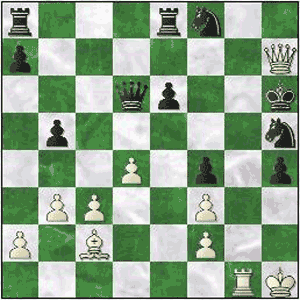
Following up with more tactics to make it a full Rook sacrifice. 26...Kxh6 (26...Kh8 is hopeless: 27.Nxd6 f5 28.Nxe8) 27.Rg1 f5 28.Qe3+ f4 29.Nxd6!!
29...Qxd6 (29...fxe3 30.Nf7#) 30.Qd3 Nf8 He thinks he has parried the threat by covering g6 and h7, but... (30...Rg8 31.Qh7#) 31.Qh7+!
and Black sees that it's time to quit with # next move unstoppable. (31.Qh7+ Nxh7 32.Rg6#) 1-0 Hoi - Gulko (Thessaloniki, 1988) P.S. If you do not have html based email software and you're using a text only system, you may find that the links are only partially highlighted and may not work. If this is the case, simply copy and paste the entire link into the browser and hit Enter. That should get you where you want to go. Comments, ideas, feedback? I'd be stoked to hear from you. Get in touch See you next month. Ken 
|
| Back to Back Issues Page |