| Back to Back Issues Page |
 |
|
LCB, Issue #085 --, Slowly Grow a Small Advantage to Win July 01, 2022 |
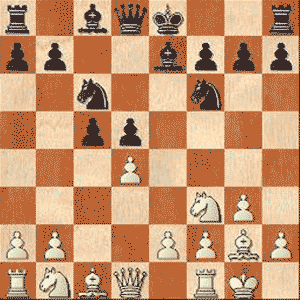
Slowly Grow a Small Advantage to WinLapoc Chess Board, Issue #085 -- GOTM #55 learn and play online chess Tactics are all very well but what about positional awareness. From optimal development in the opening, to strategic execution in the middlegame to culmination of your plans in the endgame, you have to be a positional monster. Understand middlegame positions, the dynamic possibilities and static realities for both players. Strengths and weaknesses for both, threats and opportunities for both. Get a feel for these and play accordingly. If you can do this you will be comfortable playing long cagey games that are not tactical in nature. Here you will have to outmaneuver your opponent in the long run through slightly better positioning borne out of superior appreciation for subtle positional realities. Time to witness a positional masterclass. For this we go back to a well known tournament played in the Balkan cities of Bled, Zagreb and Belgrade back in 1959. Here the famous tactician Mikhail Tal with the White pieces takes on positional giant Paul Keres with the Black pieces. The result was an absorbing struggle between the two. Slowly Grow a Small Advantage to WinTal, Mikhail - Keres, Paul [D34]GotM #55 - Bled, Zagreb, Belgrade, 1959 [Connaughton, Ken] 1.Nf3 d5 2.d4 c5 3.c4 e6 Transposing to the Tarrasch Defense. 4.cxd5 exd5 5.g3 This is the Schlechter-Rubinstein System. 5...Nc6 6.Bg2 Nf6 7.0-0 Be7
A well known position as the game heads down ...Be7 lines. 8.Nc3 0-0 9.Bg5 Be6 10.dxc5 Bxc5 Black has everything he wanted from the opening. 11.Na4 Bb6 12.Nxb6 axb6 13.Nd4 h6 14.Bf4 Qd7 15.a3 Bh3 He wants to get rid of the light square defender. 16.Qd3 Rfe8 17.Rfe1 Bxg2 18.Kxg2
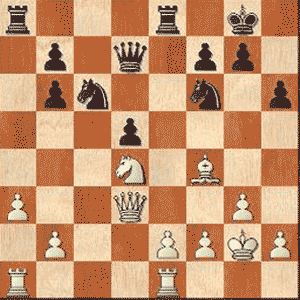
Black's d-pawn may become a problem if White can get his pieces to gang up on it. 18...Re4 19.Nf3 Rae8 20.Bd2 d4 Black would like to liquidate his isolated pawn before White can target it. 21.e3 Qd5 22.exd4 Rxd4 (22...Nxd4 23.Rxe4 Rxe4 24.Bc3 Nxf3 25.Qxf3 Re6) 23.Rxe8+ Nxe8 24.Qe2
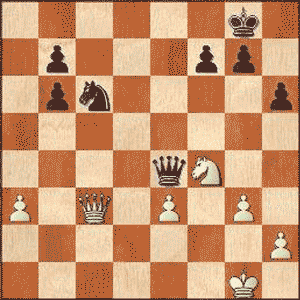
Black's Queenside pawns are doubled but it's going to be hard for White to exploit that and make a passer. Black's pieces are nicely centralized. 24...Nd6 25.Be3 Rd3 White needs to unpin the Knight before it becomes a
liability. 26.Kg1 Nc4 An interesting game of cat and mouse is starting to take shape. 27.Ne1 Rb3 28.Rc1 Nxe3 29.fxe3
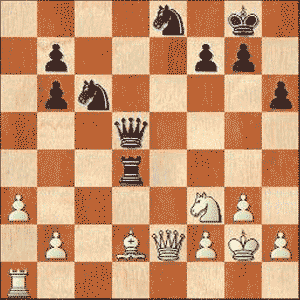
Now White has an isolani to babysit and his pieces are passive. 29...Qe5 30.Ng2 Rxb2 Black collects some material gained from his positional superiority. 31.Qd3 Qe6 32.Nf4 Rb3 Black's okay with a Queen trade. 33.Rc3 Rxc3 34.Qxc3 Qe4
And now the two Queens will dance and shadow box around the ring in attempts to out maneuver one another. Black has the center of
the ring, White is on the ropes. 35.Qb3 b5 Not allowing White to defend e3 with the capture. 36.Qxb5 Qxe3+ 37.Kf1 Qf3+ 38.Kg1 Qe3+ 39.Kf1 g5! Forcing the Knight to retreat to a less active square. 40.Ne2 Ne5 41.Qxb7 Nd3 42.Qc8+ Kg7 43.Qf5 Having grabbed the last Queenside pawn and giving himself a passer, White is able to give check and get back to cover f2. 43...Qd2
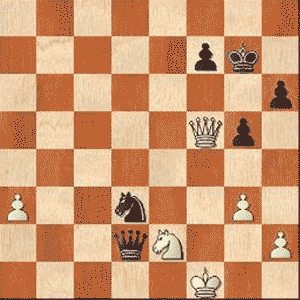
Black does not concern himself with the passed pawn. He has the more aggressive pieces and he must drive this advantage home. It's time for a King hunt! 44.Nd4 Qe1+ 45.Kg2 Qe3 Both players able to win time with threats. 46.Qd5 Qf2+ 47.Kh3 Qf1+ 48.Kg4 Nf2+ 49.Kf5 Qd3+ Expertly driving the King up the board. 50.Ke5 Ng4+ 51.Kd6 Qxa3+ He can take care of that little problem without wasting time. 52.Kc7 Qe7+ 53.Kc8 Ne3 54.Qb5 Qe4 Every move carries a threat which allows Black to retain the initiative. 55.Qb2 Kg6 56.Qb6+ f6 57.Ne6 Nc4 58.Qa6 Ne5 Black solidifies his forces and his King is much more secure than the other. 59.Nc7 Qc2 60.Qd6 Qxh2 All of this expert maneuvering has enabled Black to gradually snaffle pawn after pawn. 61.Nd5 Qf2 62.Kb7 Qxg3 Allowing the trade. 63.Qxf6+ Kh5
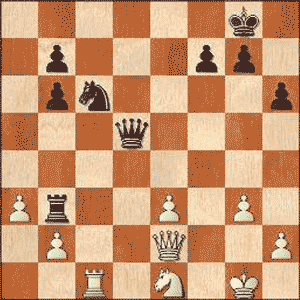
So Keres has two pawns
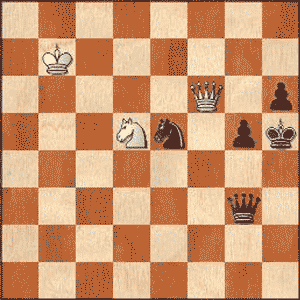
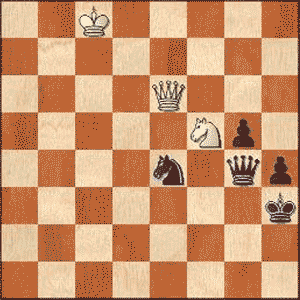
at the end of it. Will this be enough to secure victory against the mighty Tal? 64.Qe6 Ng4 65.Ne7 White will try and win those two pawns. 65...Qf3+ 66.Kc8 Kh4 67.Nf5+ Kh3 68.Kd8 (68.Nxh6?? Qf8) 68...h5 69.Qg6 Ne5 70.Qe6 (70.Qxg5?? Nf7) 70...Ng4 71.Qg6 Ne5 72.Qe6 Qd3+ 73.Nd4+ Ng4 74.Qd5 Nf2 75.Kc8 h4 76.Qe5 Qe4 77.Qf6 Black is equal to all of White's tricks. 77...Qf4 78.Nf5 Ne4 79.Qe6 Trying to set up a discovery on the Black King but... 79...Qg4!
And the game ends with this deadly blow as the Queen exchange is forced, otherwise the Knight will soon fall. 0-1 Tal - Keres, Bled, Zagreb, Belgrade, (1959) P.S. If you do not have html based email software and you're using a text only system, you may find that the links are only partially highlighted and may not work. If this is the case, simply copy and paste the entire link into the browser and hit Enter. That should get you where you want to go. Comments, ideas, feedback? I'd be stoked to hear from you. Get in touch See you next month. Ken 
|
| Back to Back Issues Page |
