| Back to Back Issues Page |
 |
|
LCB, Issue #082 --, Employ Multiple Tactics to Win April 01, 2022 |
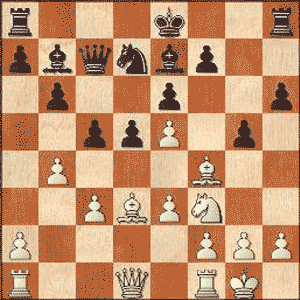
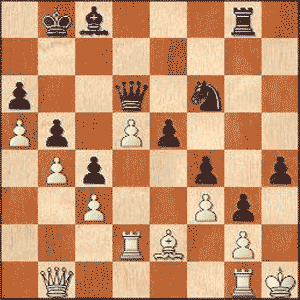
Employ Multiple Tactics to WinLapoc Chess Board, Issue #082 -- GOTM #52 learn and play online chess You've heard many times before that to become a better chess player you have to get to grip with tactics. This is very true. Tactics come in many forms and the improving chess player becomes more adept over time at spotting patterns on the board that contain chances for these tactics. Of course you won't win very many games by carrying out one single tactic or exploiting one single tactical situation during the game. You'll find rather that you must combine several tactical threats, executing some and maintaining the threat of others. The games of the masters demonstrate, over and over again, the leveraging of several tactical threats throughout the game. It is the creation of multiple threats, following through with some and holding others over the opponent's head, that paves the way to victory. One such game was played in a World Championship match in Moscow in 1966. Challenger Boris Spassky had the White pieces and defending champion Tigran Petrosian had the Black pieces. Employ Multiple Tactics to WinSpassky, Boris - Petrosian, Tigran [D03]GotM #52 - Moscow, 1966 [Connaughton, Ken] 1.d4 Queen's Pawn Game 1...Nf6 2.Nf3 e6 3.Bg5 d5 Transposing to the Tartakower Variation of the Torre Attack 4.Nbd2 Be7 5.e3 Nbd7 6.Bd3 c5 7.c3 b6 8.0-0 Bb7
and after the opening we have an intriguing game in store as the two players will maneuver strategically before the game opens later. 9.Ne5 (9.a4!? to launch an assault on the Queenside was an idea.; 9.h3 would keep the Knight out of g4.) 9...Nxe5 10.dxe5 Nd7 11.Bf4 believing this move was more likely to lead to an
advantage. (11.Bxe7 Qxe7 12.f4 0-0 13.e4=) 11...Qc7 It's a more dynamic game now but the e-pawn is facing pressure. (11...g5?! straight away would lead to 12.Bg3 h5 13.h3) 12.Nf3 White must bring the piece to e5's defense but in doing so he blocks his f-pawn from providing concrete security. 12...h6 13.b4 g5!
Black throws his Kingside at White while White has begun his assault on Black's Queenside pawns. 14.Bg3 h5 White's pieces in front of the Black pawns are vulnerable and this will cost him time. 15.h4 gxh4! Opens the Kingside. (If 15...g4 16.Ne1 Nxe5 17.Bb5+ Kf8 18.bxc5 bxc5 19.Qa4+/- and White has better chances.) 16.Bf4 (16.Nxh4? c4 17.Bc2 Bxh4 18.Bxh4 Qxe5-/+) 16...0-0-0!
It's official. Opposite sides castling and we are in for a race as both sides try to give # first. 17.a4? is energetic but Black will play to close the Queenside. (17.bxc5!? to open lines against the Black King 17...bxc5 18.Rb1~~) 17...c4! 18.Be2 (18.Bf5!? e.g. 18... 18...exf5 19.e6 Bd6 20.exd7+ Rxd7 21.Qd4=) 18...a6! so if White pushes either the a or b-pawn, Black can close it down by interlocking the chains. He will simply push his b-pawn in response to a5 or push his a-pawn in response to b5. 19.Kh1 Rdg8 Now the question is are Black's prospects better on the Kingside? 20.Rg1 Rg4 21.Qd2 Rhg8 22.a5 b5 The Black King is secure on the Queenside. 23.Rad1 Bf8 24.Nh2 Nxe5! Petrosian is making his move! 25.Nxg4 hxg4
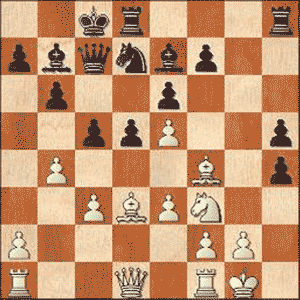
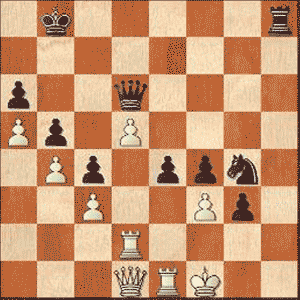
A dangerous attack is forming after the exchange sacrifice. 26.e4 Spassky knows he has to open up the center if he wants to carry any counter-threat in the game at all. 26...Bd6 (26...dxe4?? 27.Bxe5 Qxe5 28.Qd7++/-) 27.Qe3 Nd7 28.Bxd6 Qxd6 29.Rd4? (29.f4! might have taken some of the impetus out of Black's Kingside advance. 29...f5 30.e5 Qc7) 29...e5! Punishing White's error. 30.Rd2 (He could have tried 30.Rxd5!? Bxd5 31.Rd1 Nf6 32.exd5=/+) 30...f5! Now Black is ready to pawn storm White. 31.exd5 (31.exf5 h3!-/+ (31...Nf6! 32.f3 Nh5 33.fxg4 Ng3+ 34.Kh2 d4!-/+) ) 31...f4!
Continually winning time and space by kicking pieces out of the way. 32.Qe4 Queen is a poor blockader but this move is kind of necessary. (32.Qa7 e4-/+) 32...Nf6 33.Qf5+ Kb8 34.f3 He wants to close the long diagonal. (34.Qe6 Trading Queens would dilute Black's attacking power. 34...Qxe6 35.dxe6 Ne4!- /+) 34...Bc8 The White Queen is driven back for the second time in the game. 35.Qb1 g3
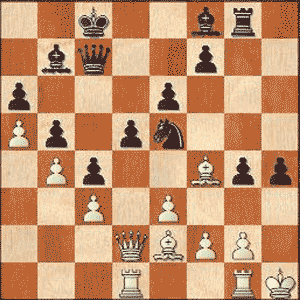
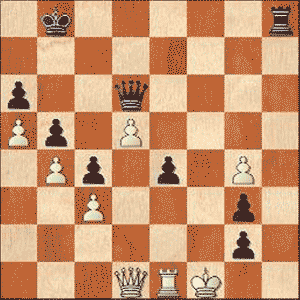
The White King is trapped in the corner and the Black pieces are well placed to target him. 36.Re1 h3 White's trying to get something going in the center but Black is way ahead. His attack is reaching it's zenith. 37.Bf1 (37.gxh3 g2+ 38.Kg1 Qd7!-+) 37...Rh8 The White King becoming ever more uncomfortable. 38.gxh3 Bxh3 39.Kg1 He had to get out of the discovery but still has a world of problems. (39.Bxh3 Qd7!) 39...Bxf1 40.Kxf1 (40.Rxf1 Qd7 41...Qh3 or 41...Qa7+) 40...e4! It's looking grim for the White King in the face of these powerful pawns. 41.Qd1 (41.fxe4 f3!-+) 41...Ng4!!
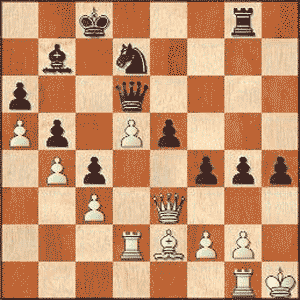
This sacrifice shows the value of the f3-pawn. It is the boy with his hands in the dyke. 42.fxg4 And now there is nothing to stop the avalanche. 42...f3 43.Rg2 Necessary. 43...fxg2+
Here White resigns in the face of a forced #. (43...fxg2+ 44.Ke2 (44.Kxg2 Rh2+ 45.Kg1 Qh6 46.Qf3 exf3 47.Re8+ Kb7 48.Re7+ Kc8 49.Re8+ Kd7 50.Re7+-+) 44...Qf4 45.Qd4 Qf3+ 46.Kd2 Qf2+ 47.Qxf2 gxf2 48.Rc1 f1Q 49.Rxf1 gxf1Q 50.Ke3 Qf3+ 51.Kd4 (51.Kd2 Rh2+ 52.Kc1 Qf1#) 51...Kc7 52.g5 (52.Kc5 Qe3#; 52.d6+ Kxd6 53.g5 Qd3#) 52...Kd6 53.g6 Qd3#) 0-1 Spassky - Petrosian, Moscow (1966) P.S. If you do not have html based email software and you're using a text only system, you may find that the links are only partially highlighted and may not work. If this is the case, simply copy and paste the entire link into the browser and hit Enter. That should get you where you want to go. Comments, ideas, feedback? I'd be stoked to hear from you. Get in touch See you next month. Ken 
|
| Back to Back Issues Page |