| Back to Back Issues Page |
 |
|
LCB, Issue #036 --, Check out the Crazy 8 May 01, 2018 |
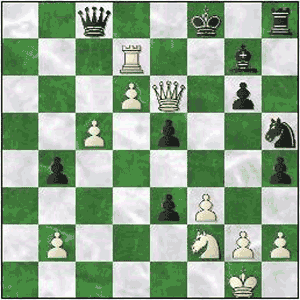
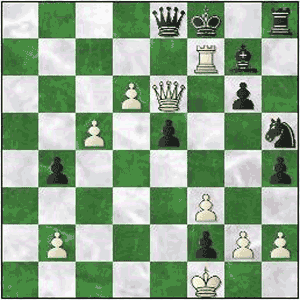
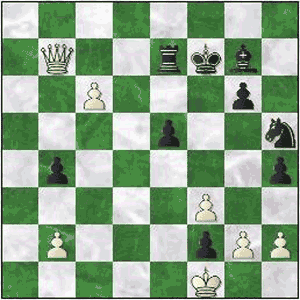
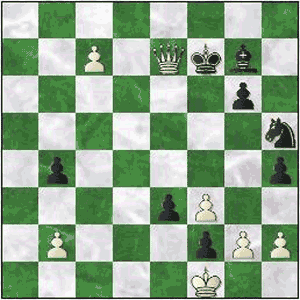
Check Out the Crazy 8Lapoc Chess Board, Issue #036 -- GOTM #5 learn and play online chess Welcome to St Petersburg. It's 1993. Grigory Serper faces off against Ioannis Nikolaidis. White goes for an English Opening and the action begins with skirmishes on the Queenside. The game explodes into life when White plays 17.Nd5!!, sacrificing the Knight when his opponent surely expected the horse to quietly retreat instead. He gets two connected passers for the piece but he's only getting started. He plays no less than 8 piece sacrifices in all and Black is forced to accept 7 of these. Serper pushes the possibilities of tactical chess to the absolute limit and claims a stunning victory. Check Out the Crazy 8Serper, Grigory (2575) - Nikolaidis, Ioannis (2440)[E70]GotM #5 - St Petersburg, 1993 1.c4 English Opening 1...g6 2.e4 Bg7 3.d4 d6 4.Nc3 Nf6 5.Nge2 Here White chooses a less common move intended to support d4 and perhaps a potential f4-push. (5.f3 is the move seen most frequently, shoring up the big center. The King's Knight will go to e2 later.) 5...Nbd7 6.Ng3 c6 7.Be2 a6 8.Be3 h5 9.f3 b5 Finally after all the shadow boxing, the opening maneuvering is interrupted by violence on the Queenside. 10.c5 dxc5 11.dxc5 Qc7 12.0-0 White adds King safety to his space advantage. 12...h4 13.Nh1 Nh5 14.Qd2 e5 Black implies that his Kingside attack is more important as he lays
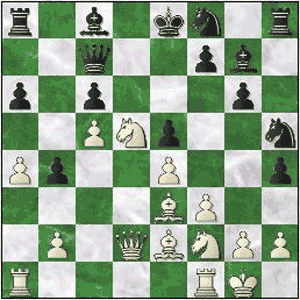
claim to f4. 15.Nf2 Nf8 Intending ...Ne6 but this plan will not come to fruition and White launches his Queenside invasion with the Black King two moves from safety. 16.a4 b4 Annexing space and seeking to drive the Knight back. Seems to do a good job of locking up the Queenside with ...a5 next to secure the b4-pawn. White's c5-pawn also looks a little vulnerable to attacks down the road, but White has a stunning solution to the dilemma. 17.Nd5!!
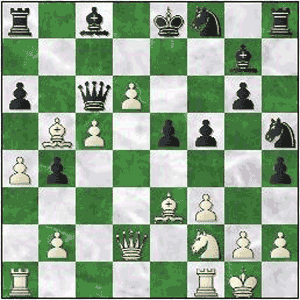
The first sacrifice. Throwing the horse on the fire, he reinvigorates his initiative on this wing, getting two advanced, connected passed pawns as compensation. (Black may have been expecting something like 17.Na2 a5 18.Rfd1 Ne6 19.Qd6 Qxd6 20.Rxd6 Nhf4= with an even game.) (17.Ncd1 was also possible. 17...Ne6 (17...a5 18.b3 Ne6=) 18.Bc4 (18.Qxb4 Nd4 19.Bxd4 exd4 20.Qb6 Be5 21.Qxc7 Bxc7=) 18...a5 19.Qd6 Qxd6 20.cxd6 Kd7 21.Bb6 Kxd6) 17...cxd5 Black must accept but now must deal with this dangerous rolling pawn mass. 18.exd5 f5 Foregoing his King's remaining cover Black tries to counterattack. 19.d6 Qc6 20.Bb5!!
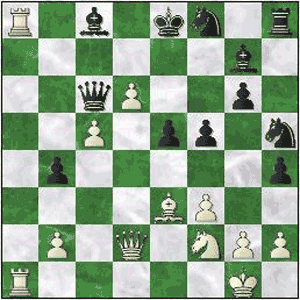
The second sacrifice. The Queen is pinned so the Bishop must be dealt with swiftly. (20.Nd3 also maintains White's advantage and after 20...Nf4 he can build on it with something like 21.Nxb4 Nxe2+ 22.Qxe2 Qb7 23.Qc4 Rb8 24.Nd5 Kf7 25.b4 Qd7) 20...axb5 21.axb5 Qxb5 (If he plays 21...Qb7 in an attempt to hold the Rook, it proves futile: 22.c6 Rxa1 (22...Qb8 No matter what he does, he is losing material, 23.Qd5 Rxa1 24.Rxa1 Nf6 25.Qxe5+ Kf7 26.Ra7+ And Black must give up the Queen to stay in the game. 26...Qxa7 (26...Kg8 is beaten by 27.c7+- trapping the Queen.) 27.Bxa7+- In terms of material it's even but White's more active pieces and three passed pawns will win the game for White.) 23.cxb7 Rxf1+ 24.Kxf1 Bxb7+- and White wins.) 22.Rxa8 White's tactics up to this point have yielded good dividends. Rook and pawn for the two pieces sees him back to more or less equal on material. He still has those two passers, a much safer King and far superior pieces, poised to spring into action. 22...Qc6 23.Rfa1
The third sacrifice. White sees that
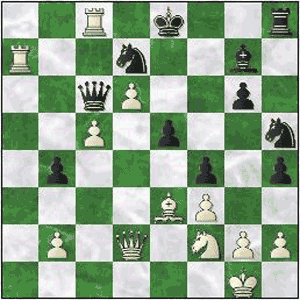
after 23...f4, his Bishop has no escape but presses on with his attack. He calculates that Black does not have the time to take the Bishop and defend against White's attack. 23...f4 24.R1a7 Nd7 Closing the seventh rank and belatedly preparing to castle. 25.Rxc8+
The fourth sacrifice. Black pays the price for not castling in a timely fashion. (25.Ra6 leads to numerous interesting lines such as for instance: 25...Qxa6 (25...Qb5 26.Rxc8+ Kf7 27.Qd5+ Kf6 28.Ne4+ Kf5 29.Qf7+ Nhf6 30.Rxh8 Qe2 31.h3 Bxh8 32.c6 Qxa6 33.cxd7 Qb7 34.Nc5 Qxd7 35.Nxd7 fxe3 36.Nf8 e2 37.Kf2+-) 26.Rxa6 fxe3 27.Qd5 (27.Qxe3 Bxa6 28.c6 Bb5 29.Qe4 Nf4 30.c7 Kf7 31.Qb7 Ne2+ 32.Kh1 Nd4 33.c8Q Rxc8 34.Qxc8 Bf6 35.h3 Bc6 36.Ne4+-) 27...exf2+ 28.Kxf2 Bxa6 29.Qe6+ Kf8 30.Qxd7+/-; 25.Ng4 lets Black castle 25...0-0 26.Bf2 e4 27.Qxb4 exf3 28.Qb3+ Kh7 29.Qxf3 Qb5+/- and White is still better but he has allowed Black's King to slip out of the center.) 25...Qxc8 26.Qd5 fxe3 27.Qe6+ Kf8 28.Rxd7
The fifth sacrifice. White could easily have preserved his f2-Knight. Black's steed on d7 wasn't going anywhere as he was pinned both to the Queen on c8 and far more importantly to the mating square on f7. Even so White again places speed above material and allows his f2-Knight to fall. 28...exf2+ 29.Kf1! (If 29.Kxf2? Qxc5+-+ and the tables turn.) 29...Qe8 30.Rf7+!
The sixth sacrifice. This is a beautiful decoy. Giving up the Rook to pull the Queen on to f7, thereby depriving the King of this valuable flight square, is bold when there are many ways to win. It's clear that White has seen the position ahead after the following forcing sequence. (White can't hand Black the initiative with a move like 30.Re7 as the following disastrous outcome would follow. 30...Qb5+ 31.Kxf2 Qxc5+ 32.Ke2 Nf4+ 33.Kd1 Qd4+ 34.Kc1 Nxe6-+; 30.Qxe8+ allows Black to equalize and maybe even get an advantage. 30...Kxe8 31.Re7+ Kf8 32.c6 (32.Kxf2 Nf6 33.Rb7 Kg8 34.c6 Kh7 35.Rxb4 g5 36.c7 Nd7 37.Ke3 Rf8 38.Ke4 Kg6=) 32...Ng3+ 33.Kxf2 Nf5 34.Rxg7 (34.Rd7 Ke8 35.Rb7 e4 36.d7+ Kd8 37.Rb8+ Ke7 38.d8Q+ Rxd8 39.c7 Rd2+ 40.Ke1 Rc2 41.c8Q Rxc8 42.Rxc8 exf3 43.Rc2 b3-+) 34...Nxd6 35.Rd7 Nf7 36.Ke3 Kg7 37.Ke4) 30...Qxf7 31.Qc8+ Qe8 32.d7! The point of 30.Rf7+. 32...Kf7 33.dxe8Q+ Rxe8 Black has a material advantage but his pieces are out of position and the White Queen has the time to inflict the decisive blows. 34.Qb7+ Re7 35.c6!
The seventh sacrifice. In this game White has sacrificed every piece. 35...e4 (Clearly Black can't take as 35...Rxb7 36.cxb7 and the pawn cannot be stopped.) 36.c7 e3 The Rook and two pawns amount to a threat that White must neutralize. 37.Qd5+ The only move to retain the upper hand. (If 37.Qxb4 , then the Rook and two passers will give Black an even game. 37...e2+ 38.Kxf2 e1Q+ 39.Qxe1 Rxc7) 37...Kf6 38.Qd6+ Kf7 39.Qd5+ Kf6 40.Qd6+ Kf7 41.Qxe7+
The eighth sacrifice. This time Black takes the Queen but the c7-pawn will promote immediately and without the Rook, Black's advanced, connected passed pawns have no prospects of the success enjoyed by their White counterparts. 41...Kxe7 42.c8Q Bh6 The inclination to support his pawns we can understand but it is futile. 43.Qc5+ Ke8 44.Qb5+ Kd8 45.Qb6+ Kd7 46.Qxg6 White systematically kicks the legs out from under Black's crumbling resistance. 46...e2+ 47.Kxf2 (47.Kxe2?? Nf4+ 48.Kxf2 Nxg6) 47...Be3+!? One last try. 48.Ke1! With that Black gives up the ghost and accepts his fate. (48.Kxe2?? would allow Black a remarkable reprieve: 48...Nf4+ 49.Kxe3 Nxg6 and any advantage that exists is Black's.) 1-0 Serper - Nikolaidis (St Petersburg, 1993) P.S. If you do not have html based email software and you're using a text only system, you may find that the links are only partially highlighted and may not work. If this is the case, simply copy and paste the entire link into the browser and hit Enter. That should get you where you want to go. Comments, ideas, feedback? I'd be stoked to hear from you. Get in touch See you next month. Ken 
|
| Back to Back Issues Page |
