| Back to Back Issues Page |
 |
|
LCB, Issue #076 --, Tear Up the Town with a Dominating Knight October 01, 2021 |
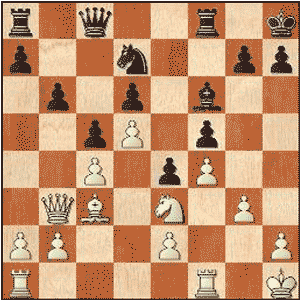
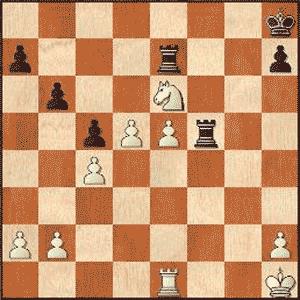
Tear Up the Town with a Dominating KnightLapoc Chess Board, Issue #076 -- GOTM #46 learn and play online chess When I first discovered chess the Knight was my favorite piece. The set we had in school had Knights that really appealed to me. They were nicely sculpted pieces that looked like wild horses. Later I came to understand that along with the Rook and Queen, the Bishop was also better than a Knight in most endgames thanks to it's long range powers versus the Knight's short range. This advantage on an open endgame position is offset by the Knight's particular skill set in a busy middlegame position. Indeed the Knight is sometimes better than a Bishop in closed endgames. The more pawns that are on the board the better for the Knight. In some middlegames a Knight in an advanced outpost can be better than a Rook! Let's see the Knight in action. One of the most brilliant displays of handling a Knight came in the World Championship match in 1935 between Max Euwe and Alexander Alekhine. The game became known as the Pearl of Vandervoort and it features an extraordinary illustration of what a Knight can do. Tear Up the Town with a Dominating KnightEuwe, Max - Alexander, Alekhine [A90]GotM #46 - Zandvoort, 1935 [Connaughton, Ken] This game became known as The Pearl of Zandvoort after some astonishing play. 1.d4 Queen's Pawn Game 1...e6 2.c4 f5 Transposing to the Dutch Defense 3.g3 Bb4+ 4.Bd2 Be7 This maneuver seems to lose a tempo but Alekhine liked 3...Bb4+ 4.Bd2 Be7 because he believed d2 to be a bad square for the White Bishop. 5.Bg2 Nf6 6.Nc3 0-0 7.Nf3 Ne4 8.0-0 b6 9.Qc2 Bb7 10.Ne5 Nxc3!?
11.Bxc3 White does not accept the offer and keeps his position solid. (if 11.Bxb7 then after 11...Nxe2+ 12.Kh1 Nxd4 13.Qd3 Nbc6-/+ Black has two pawns and is still better after the exchange sac.) 11...Bxg2 12.Kxg2 Qc8 To defend e6. 13.d5 d6 14.Nd3 e5 15.Kh1 c6 16.Qb3 Kh8 17.f4 e4 18.Nb4 c5 19.Nc2 The terrain created by these interlocking pawn chains make a closed position which is unpleasant for Bishops but ideal for a Knight. 19...Nd7 20.Ne3 Bf6
Alekhine offers Euwe three central pawns for a minor piece. (20...Nf6+/= would have been the more low key option.) 21.Nxf5 White goes for it. (21.Bxf6= would have been a way to keep the piece but White likes the deal offered in the game.) 21...Bxc3 22.Nxd6 Qb8 23.Nxe4 Bf6 24.Nd2
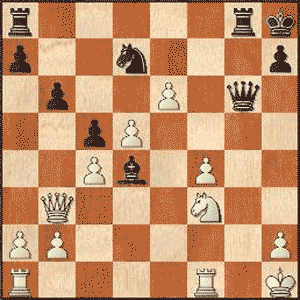
White likes his Knight better than the Black Bishop and will employ this piece again in the near future. 24...g5 Black feels like he got the worst of the recent exchanges and decides he needs to play energetically to gain some counterplay. He wants to open a file on the Kingside, this will mean danger for both Kings. 25.e4 gxf4 26.gxf4 Bd4 The position is getting sharper as the moves go by. Both Kings are vulnerable. Black has an extra piece but White's center looks very dangerous. Which will prove the more valuable. 27.e5 Qe8 28.e6 Rg8 Both players are keen to utilize their respective edges. 29.Nf3 The Knight that
starred earlier stirs himself again. 29...Qg6
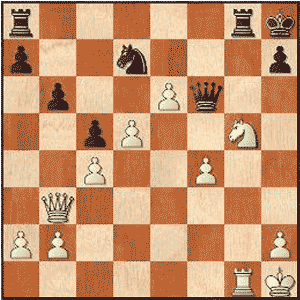
Black moves his heavy pieces over to the g-file. 30.Rg1 White is happy to give up an exchange sacrifice in order to blunt Black's attacking power. The Bishop on d4 is worth at least a Rook. 30...Bxg1 31.Rxg1 Qf6 32.Ng5
Black now has a Rook for the three pawns but these three pawns are offering bases of operations deep in Black's territory. White is threatening Nf7+ now with horrible consequences for Black. 32...Rg7 33.exd7 He blunts the power of his pawns a little but
takes back a minor piece. 33...Rxd7 34.Qe3 Re7 35.Ne6
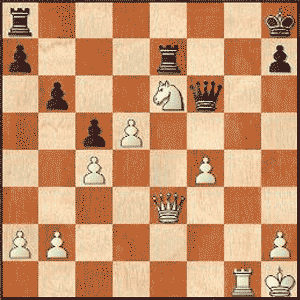
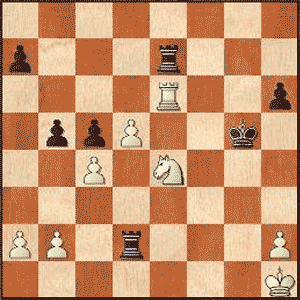
e6 is not quite f7 but it's still a great outpost for the White Knight. 35...Rf8 36.Qe5 Qxe5 37.fxe5 The exchange pulls the loose pawn back into contact with his comrades and the Knight is worth at least a Rook and maybe more. 37...Rf5 38.Re1
The center should neutralize the power of the Black Rooks but good play is still required to demonstrate the superiority of White's position. 38...h6 Giving h7 to the King. 39.Nd8! Rf2 (Of course 39...Rfxe5 40.Rxe5 Rxe5 41.Nf7++- wins for White.) 40.e6 Rd2 To stop d6 as the two passed pawns threaten to run the Rook over. 41.Nc6 This wonderful Knight continues to torment Black, now evicting the Blockader from e7. 41...Re8 42.e7 b5 43.Nd8 Kg7 44.Nb7 Kf6 45.Re6+! Pushing the King away. 45...Kg5 (45...Kf7? 46.Nd6+-/+) 46.Nd6 Rxe7 Black finally accepts it's time to give up the Rook for the pawn. 47.Ne4+
This is too much and Black resigns. 1-0 Euwe - Alekhine, Zandvoort (1935) P.S. If you do not have html based email software and you're using a text only system, you may find that the links are only partially highlighted and may not work. If this is the case, simply copy and paste the entire link into the browser and hit Enter. That should get you where you want to go. Comments, ideas, feedback? I'd be stoked to hear from you. Get in touch See you next month. Ken 
|
| Back to Back Issues Page |