| Back to Back Issues Page |
 |
|
LCB, Issue #074 --, Wrap Up the Middlegame with a Crazy King March August 01, 2021 |
Wrap Up the Middlegame with a Crazy King MarchLapoc Chess Board, Issue #074 -- GOTM #44 learn and play online chess You play with energy from the start and you have the initiative. You've got your opponent on the ropes and you feel like the breakthrough is but a matter of time. And yet as the struggle goes on it seems that he has an answer to every problem you create for him. You have the high ground, you control the center, your pieces are active, his passive. And yet, you can't quite break his resistance. He always seems to have a clever resource to just about hold the position. All of your pieces are playing active roles in the game. You need one more actor to tip the balance decisively in your direction, but every piece is already deployed. Every piece except one. Your King isn't getting his hands dirty. Time for his Majesty to get to work! Let's drop in to Tilburg, Holland in 1991 to witness an astonishing King March through a busy middlegame battlefield. This courageous King was able to seal victory against a previously stubborn opponent in quite remarkable fashion. Our two adversaries are Nigel Short with White and Jan Timman with Black. Wrap Up the Middlegame with a Crazy King MarchShort, Nigel D - Timman, Jan H [B04]GotM #44 - Tilburg, 1991 [Connaughton, Ken] 1.e4 King's Pawn Game 1...Nf6 Alekhine Defense 2.e5 Nd5 3.d4 d6 4.Nf3 Modern Variation 4...g6 5.Bc4 Nb6 6.Bb3 Bg7 7.Qe2 Nc6 8.0-0 0-0
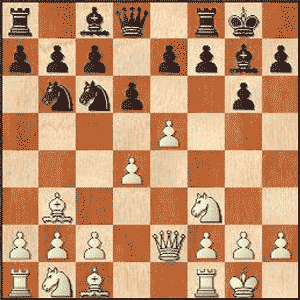
Both players will need to develop on the Queenside. 9.h3 a5 10.a4 (10.c3 a4 11.Bc2) 10...dxe5 Black resolves the central tension. 11.dxe5 Nd4 12.Nxd4 Qxd4
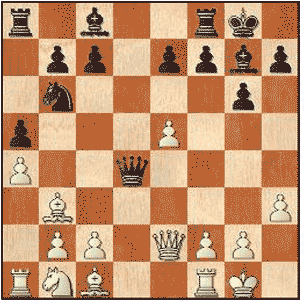
And a fight for e5 will take place. 13.Re1 e6 14.Nd2 Nd5 15.Nf3 Qc5 16.Qe4 Qb4 Offering the Queen trade. 17.Bc4 Nb6 18.b3 Nxc4 19.bxc4
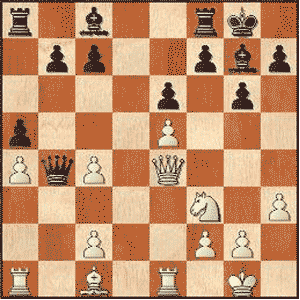
White is willing to rupture his pawns to keep the Queens on the board. 19...Re8 20.Rd1 Qc5 21.Qh4 White sees the weaknesses on Black's dark squares and is methodically progressing with his attack. 21...b6 22.Be3 Qc6 23.Bh6 Bh8 24.Rd8
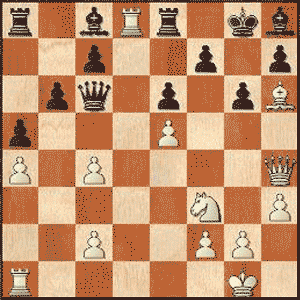
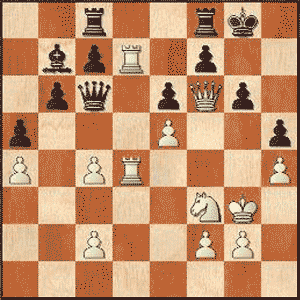
And now Black's difficulties become more apparent. 24...Bb7 25.Rad1 Bg7 Black reluctantly trades dark-square Bishops. 26.R8d7 Rf8 27.Bxg7 Kxg7 28.R1d4 Rae8 29.Qf6+ Kg8 30.h4 The Knight of course can't join the attack on g5 as he is blocking ...Qxg2# so White needs another to be the next participant in White's attack. 30...h5 A necessary device but the dark squares are weakened still further. 31.Kh2 The last and decisive attacker begins his journey to the coal-face. The King can attack like any other piece, even in the middlegame. This is possible because Black's heavy pieces are tied up and have no way to get within sight of the White King. He is on the other side of a closed position so he can become active in relative safety. 31...Rc8 This is an error that will lead to his downfall. (He had to play 31...Bc8+/= to stay in the contest.) 32.Kg3!
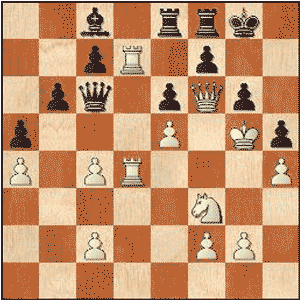
Black hadn't anticipated an aggressive middlegame King! 32...Rce8 33.Kf4 The King continues to stride forward. 33...Bc8 Far too late. 34.Kg5
White happily sacrifices the Rook as his attack can't be stopped and he is just a handful of moves from victory. Black resigns. (34.Kg5 Kh7 (34...Bxd7 35.Kh6 Bc8 36.Qg7#) 35.Qxg6+ Kh8 36.Qh6+ Kg8 37.Kxh5 (37.Kf6 Qxf3+ 38.gxf3 Bxd7 39.Qg7#) 37...Qe4 38.Rxe4 Bxd7 39.Rg4#) 1-0 Short - Timman, Tilburg (1991) P.S. If you do not have html based email software and you're using a text only system, you may find that the links are only partially highlighted and may not work. If this is the case, simply copy and paste the entire link into the browser and hit Enter. That should get you where you want to go. Comments, ideas, feedback? I'd be stoked to hear from you. Get in touch See you next month. Ken 
|
| Back to Back Issues Page |
