| Back to Back Issues Page |
 |
|
LCB, Issue #059 --, Target the Isolated d-Pawn for Destruction April 01, 2020 |
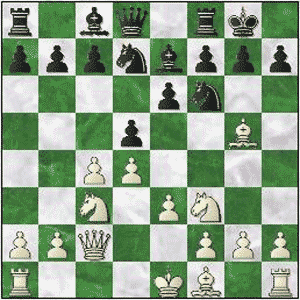
Target the Isolated d-Pawn for DestructionLapoc Chess Board, Issue #059 -- GOTM #28 learn and play online chess One of the major themes running through the Queen's Gambit Declined is playing for and against isolated d-pawns. Depending on the variation either side can find themselves with the isolani. It's a double-edged sword for the player defending the pawn. While all minor pieces are on the board, the defenders often have an initiative, with outposts for them on c5 and e5. The open c and e-files also give the defending player chances to mount an attack. As the pieces come off, the pawn becomes weaker and the defenders' initiative wanes, it becomes more of a liability. A beautiful game showing many of the themes involved with the IQP was played during the 1921 World Championship in Havana, Cuba. Emanuel Lasker takes on Jose Raul Capablanca as they duel around the much aforementioned isolated d-pawn. Target the Isolated d-Pawn for DestructionLasker, Emanuel - Capablanca, Jose Raul[D61]GotM #28 - Havana, 1921 [Connaughton, Ken] 1.d4 d5 2.c4 e6 Queen's Gambit Declined 3.Nc3 Nf6 4.Bg5 Be7 5.e3 0-0 6.Nf3 Nbd7 7.Qc2
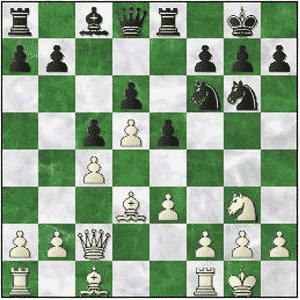
Rubinstein Variation 7...c5 The thematic c5 strike. 8.Rd1 Qa5 9.Bd3 h6 10.Bh4 cxd4 11.exd4 dxc4 12.Bxc4 After the exchanges White has an isolated pawn. Much of the action will center around this pawn. 12...Nb6 The first thing Black does is fight for control of d5, he wants to blockade the isolated d-pawn. 13.Bb3 Bd7 14.0-0 Rac8 15.Ne5 Bb5 16.Rfe1 Nbd5 17.Bxd5 (Lasker could have avoided his fate in the game with 17.Bxf6 Bxf6 (17...Nxf6? 18.Ng6 Bd6 (18...Rfe8?? 19.Rxe6 Bb4 (19...fxg6?? 20.Ra6++-; 19...fxe6 20.Bxe6+ Kh7 21.Nf8+ Kh8 22.Qh7+ Nxh7 23.Ng6#) 20.Rxf6 gxf6 21.Ne5 Kh8 22.Qd2 Kg7 23.Ng4 Rh8 24.Qf4+-) 19.Nxf8 Kxf8+/-) 18.Bxd5 exd5 19.Qf5 Bc6 20.h3 Rfe8 21.Ng4 Bg5 22.f4 g6 23.Qd3 (23.Rxe8+ Rxe8 24.Qd3 h5 25.fxg5 hxg4 26.hxg4 Qd8+/=) 23...h5 (23...Bxf4? 24.Nf6++/-) 24.fxg5 hxg4 25.hxg4 b5+/= and even with the tripled pawns, White should get a draw.) 17...Nxd5 18.Bxe7 Nxe7 19.Qb3 Bc6 20.Nxc6 bxc6 Taken with the pawn to increase Black's control on d5. 21.Re5 Qb6 22.Qc2 Rfd8 With four units controlling d5 versus White's two, Black has won the battle for this square. 23.Ne2 Rd5 24.Rxd5 cxd5 Fixing his pawn structure, permanently blocking the isolated d4-pawn and taking control
of the newly opened c-file. 25.Qd2 Nf5 26.b3 Releasing the Queen from the defense of the b-pawn. 26...h5 27.h3 h4!?
The h6-...h5-...h4 advance is played to restrict White's Kingside. 28.Qd3 Rc6 29.Kf1 g6 Solidifying the f5-Knight, g4 can't be played because of the en passant rule. Black's pieces are bearing down on the isolated pawn, forcing White's pieces to passively defend it. 30.Qb1 Qb4 31.Kg1 a5 A minority attack to undermine White on the Queenside. 32.Qb2 a4 33.Qd2 White needed to submit to the exchange as Black was scheming to exchange his a-pawn for White's a and b-pawns. The exchange is good for Black because the
less pieces there are on the board, the harder it becomes to hold these weak pawns (Black will also exchange pawns on the b-file to leave White with a second weak pawn. 33...Qxd2 34.Rxd2 axb3 35.axb3
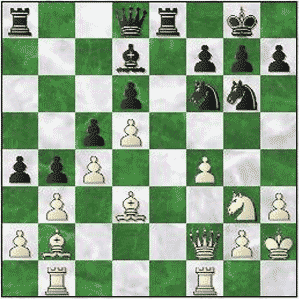
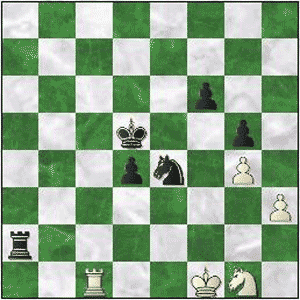
Now Black will maneuver against these two weak pawns and White will have to grimly defend them. See how this struggle makes Black's Rook, Knight and King more and more active and powerful, just as White's trio become more passive and weaker. 35...Rb6 36.Rd3 Ra6 37.g4 hxg3 38.fxg3 Ra2 39.Nc3 Rc2 40.Nd1 Ne7 41.Nc3 Rc1+ 42.Kf2 Nc6 The Black Rook is much more active than the White Rook which is frozen to the spot. 43.Nd1 Rb1 Black immediately capitalizes on access to b1 and now the threat to the b-pawn can't be
repelled. 44.Ke2 We can't transport ourselves to the room on the day this game was played in Havana, Cuba in 1921, but we can gues the pressure of defending an increasingly grim position in the context of an increasingly grim World Championship contest against the strongest player in the world. Lasker finally cracks and gives up on the doomed b-pawn. (44.Ke1 would have served him better.) 44...Rxb3 45.Ke3 White cuts his losses and hold the d-pawn. (45.Rxb3 Nxd4+ 46.Kd3 Nxb3+- with a decisive advantage for Black.) 45...Rb4 The White King can't move, the White Rook has only one square and the White Knight is out of position. 46.Nc3 The Knight makes his way to defend the isolated pawn once more. 46...Ne7 47.Ne2 Nf5+ Just in time too as the King is driven from
the defense of the invalid. 48.Kf2 g5 49.g4 White evicts the troublesome Knight but he will return to provide some more torment. 49...Nd6 50.Ng1 Ne4+
Compare the Black Knight with his miserable opposite number. 51.Kf1 Rb1+ The difference in power between the pieces is becoming ever more significant. 52.Kg2 Rb2+ 53.Kf1 The White King is confined to the home rank. The White Knight is holding h3 and the Rook is holding d4. None can act. 53...Rf2+ Torturing his opponent. 54.Ke1 Ra2 55.Kf1 Kg7 Black's Rook and Knight have established their dominance, but their King now needs to join the
fight in order to make progress. 56.Re3 Kg6 57.Rd3 f6 All of Black's pawns enjoy either direct protection or shelter from White's pieces. The King is free to roam. 58.Re3 Kf7 As the King moves into position White can do no more than sit and wait for the invasion. 59.Rd3 Ke7 60.Re3 Kd6 61.Rd3 Rf2+ 62.Ke1 Rg2 63.Kf1 Ra2 64.Re3 e5 65.Rd3 exd4
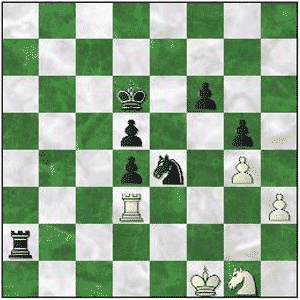
Finally the battle for the isolated d-pawn created by Black's 11th move is settled. 54 moves later the pawn falls. Success in this struggle will prove decisive. The final act begins. 66.Rxd4 Kc5 67.Rd1 d4 68.Rc1+ Kd5
The passed pawn is unstoppable without untenable losses. White resigns. 1-0 Lasker - Capablanca (Havana, 1921) P.S. If you do not have html based email software and you're using a text only system, you may find that the links are only partially highlighted and may not work. If this is the case, simply copy and paste the entire link into the browser and hit Enter. That should get you where you want to go. Comments, ideas, feedback? I'd be stoked to hear from you. Get in touch See you next month. Ken 
|
| Back to Back Issues Page |