| Back to Back Issues Page |
 |
|
LCB, Issue #053 --, Sacrifice Big to Drag the King Out into the Open October 01, 2019 |
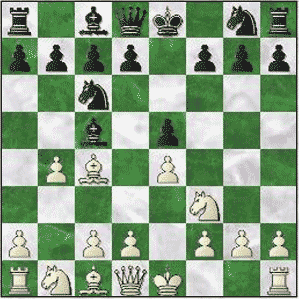
Sacrifice Big to Drag the King OutLapoc Chess Board, Issue #053 -- GOTM #22 learn and play online chess He with the greater material usually wins the war. But even more important than a material advantage over the whole board is a material advantage in the fight zone, at the coal face, where the battle is being waged. That's why sacrifice in order to compromise the enemy King has always been an important theme. It matters not if you're down material as long as you have more pieces where it matters, hunting down your opponent's King. It's good to sacrifice a piece, any piece, if by doing so you can draw the King out from behind the safety of his army, into the open, where your active pieces can put him to the sword. There are many sightings of this idea throughout the annals of chess history and we can go back to London in 1863 for a nice example. Here, William Steinitz, later the first Official World Champion, demonstrates how to precipitate and execute a King Hunt against his casual opponent, Rock. Sacrifice Big to Drag the King OutSteinitz,William - Rock [C52]GotM #22 - London, 1863 [Connaughton, Ken] 1.e4 e5 2.Nf3 Nc6 3.Bc4 Bc5 4.b4 Evans Gambit
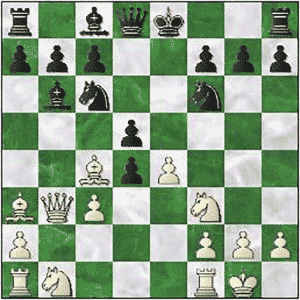
4...Bxb4 (Lasker Variation: 4...Bxb4 5.c3 Ba5 6.d4 d6 7.0-0 Bb6 8.dxe5 dxe5 9.Qxd8+ Nxd8 10.Nxe5 Be6+/= This variation takes the sting out of White's attack by returning the gambit pawn and exchanging queens, and according to Reuben Fine, the resulting simplified position "is psychologically depressing for the gambit player" whose intent is usually an aggressive attack. (Note taken from Wikipedia)) 5.c3 Ba5 6.d4 exd4 7.0-0 Nf6 (7...dxc3 8.Qb3 Qf6 9.e5 Qg6 10.Nxc3 Nge7 11.Ne2 b5 12.Bd3 Qe6 13.Qb2 Ng6 14.Nf4 Nxf4 15.Bxf4 a6 16.Rac1 Bb7 17.Rfd1 Bb6=/+) 8.Ba3 Bb6 (8...d6=/+ should be played to facilitate castling.) 9.Qb3 d5?
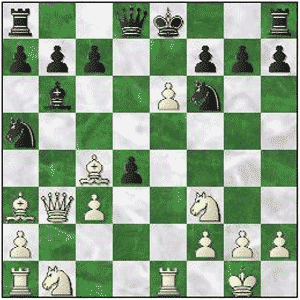
(The game losing mistake and from here Steinitz does not put a foot wrong. [Here was Black's last chance to play ...d6 and survive the opening. Now his King will remain trapped in the center. 9...d6=/+) 10.exd5 Na5 11.Re1+! An important intermezzo that will set the attack in train. 11...Be6 12.dxe6!!
A brilliant chess mind like that of William Steinitz can see that his Queen will
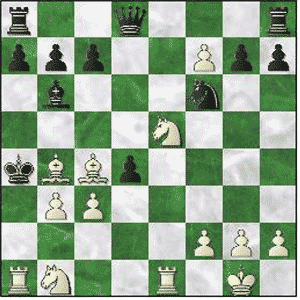
not be needed in this mating net and he is best served by continuing the assault on Black's stranded King. 12...Nxb3? The game was already over but this mistake, although plausible to an amateur, has ensured a forced # in 6 moves. (12...Nxc4 13.Qxc4 Qd5+-) 13.exf7+ Now Black will pay the price for his failure to bring his King to safety. But the thing that makes this game interesting is the way White combines his pieces to force the enemy King inexorably forward where he will meet his demise. 13...Kd7 14.Be6+ Not allowing the King to disappear behind the Queenside pawns. 14...Kc6 15.Ne5+ Yet again the ability to bring another piece into the attack means that Black can't retreat. All of the squares behind him remain under White's control. 15...Kb5 16.Bc4+ Ka5 17.Bb4+ Ka4 18.axb3#
An impressive King Hunt that White saw in his mind's eye after 12...Nxb3? 1-0 Steinitz - Rock (London, 1863) P.S. If you do not have html based email software and you're using a text only system, you may find that the links are only partially highlighted and may not work. If this is the case, simply copy and paste the entire link into the browser and hit Enter. That should get you where you want to go. Comments, ideas, feedback? I'd be stoked to hear from you. Get in touch See you next month. Ken 
|
| Back to Back Issues Page |

 A risky move. Black wants to fight!
