| Back to Back Issues Page |
 |
|
LCB, Issue #033 --, Knight after Knight February 01, 2018 |
Knight after KnightLapoc Chess Board, Issue #033 -- GOTM #2 learn and play online chess Last month we took in a terrific battle in London between Zukertort and Blackburne. Zukertort gained the initiative in the center and launched a wonderful attack on the enemy King, always staying one step ahead of his skillful and dangerous adversary. This month we stay in London to enjoy another tactical master class from the late 19th Century. Today our protagonists are George MacDonnell and Henry Bird. The game starts with a King's Gambit that goes down the path of the Kieseritzky Gambit. As is the fashion of the times, the game is played in a cut-throat fashion as both players jettison the principles of opening development and King safety. A Queen sacrifice among others and two successive under-promotions make this crazy game a Romantic Era Classic. Knight after KnightMacDonnell,George Alcock - Bird,Henry Edward [C39]GotM #2 - London, 1875 This marvelous game was dubbed "Knight after Knight". You'll see why. 1.e4 e5 2.f4 King's Gambit 2...exf4 Accepted. We're in for an exciting ride. 3.Nf3 g5 4.h4 g4 5.Ne5 White chooses the Kieseritzky Gambit. 5...h5 (5...Nf6= is the most common move in the position.; 5...d6= is also played frequently but the text move is also popular.) 6.Bc4 Nh6 7.d4 d6 Driving the invader back and opening the door for his Bishop. 8.Nd3 f3 9.g3 In order to keep his Kingside closed, White allows Black a strong passed pawn.
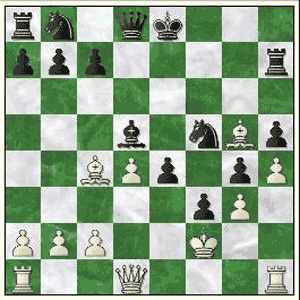
9...f5 In contrast Black flings his Kingside forward believing that White's pieces will not be able to reach his King. 10.Nc3 fxe4 11.Nxe4 Nf5 (11...d5 doesn't work because of 12.Bxd5 Qxd5 13.Nf6++-) 12.Kf2 Be7 13.Nf4 Rh7 14.Ng6 d5 15.Nxe7 dxe4 16.Nd5 Be6 17.Bg5 Bxd5! Giving up the Queen for two pieces but the two central passers will give him yet more material.
(17...Qd6 loses whatever initiative Black had. 18.Nf6+ Kf7 19.Nxe4 (The juicy looking Rook should be turned down as 19.Nxh7?? is a fatal error: 19...Qxg3+ 20.Kf1 Bxc4+ 21.Qd3 Bxd3+ 22.cxd3 Qg2+ 23.Ke1 Qe2#)
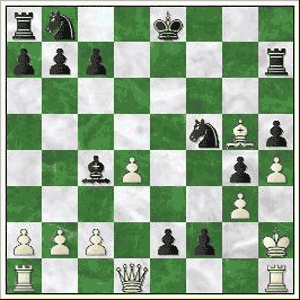
19...Qxd4+ 20.Qxd4 Nxd4 21.Bd3=) 18.Bxd8 e3+! 19.Kg1 Bxc4 20.Bg5 f2+ Those two devils keep trundling forwards. 21.Kh2 e2
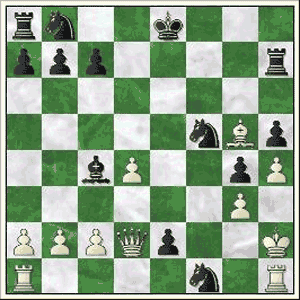
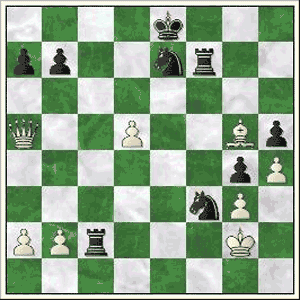
22.Qd2 f1N+! Forcing the exchange sac.
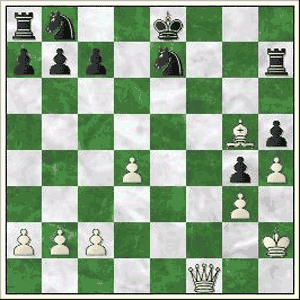
23.Rhxf1 exf1N+! And repeating the trick. 24.Rxf1 Bxf1 25.Qe1+ Ne7 26.Qxf1 Even after White takes back one minor piece we see that Black has two Rooks and a Knight for a Queen and a pawn.
26...Nbc6 27.d5 He cannot let Black castle. 27...Rf7 28.Qc4 Ne5 29.Qxc7 Prevents castling but this only opens lines of attack for Black. 29...Nf3+ 30.Kg2 Rc8 31.Qa5 Rxc2+ Winning the Bishop and the King Hunt begins as the Queen watches on helplessly.
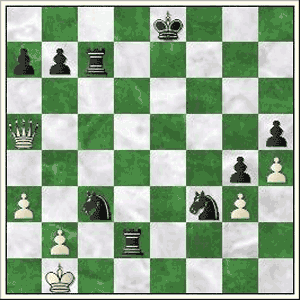
32.Kf1 (32.Kh1?? Rh2#) 32...Nxg5+ 33.Ke1 Nf3+ 34.Kd1 Rd2+ 35.Kc1 Nxd5 The four Black pieces converge on the hapless King. 36.a3 Rc7+ 37.Kb1 Nc3+! The winning sacrifice. White is forced to open the second rank to the Rook.
38.bxc3 Absolutely forced. (38.Ka1 Rd1#; 38.Kc1 Rd1+ 39.Kc2 Nd4#) 38...Re7 White has seen enough and calls a halt to proceedings. 1-0 Play back the moves of this great game.
P.S. If you do not have html based email software and you're using a text only system, you may find that the links are only partially highlighted and may not work. If this is the case, simply copy and paste the entire link into the browser and hit Enter. That should get you where you want to go. Comments, ideas, feedback? I'd be stoked to hear from you. Get in touch See you next month. Ken 
|
| Back to Back Issues Page |

