| Back to Back Issues Page |
 |
|
LCB, Issue #122 --, Take Out the French with the Paulsen August 01, 2025 |
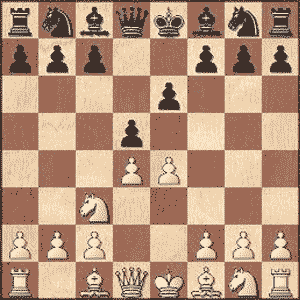
Take Out the French with the PaulsenChessorb Classic, Issue #122 -- GOTM #92 Chessorb Classic The French Defense is a popular complex for many players when they face 1.e4. It gives Black a solid defense and also long term annoying pressure on White's center. It has been responsible for many Black victories at all levels. Of course the beauty of chess means it is possible to fight against and take down any system your opponent may use. It all comes down to who plays the position better. Playing against the French requires nerve and finesse. Plus a penchant for playing with energy. You have to take the fight to your opponent. This month's game shows us one possible conceptual blueprint for combatting the French. Bill Wall faced his namesake William Wall in Washington, USA back in 1969. Bill marshalled the White pieces against the French Defense and gave us much food for thought. Take Out the French with the PaulsenWall, Bill - Wall, William [C10]GotM #92 Washington, 1969 [Connaughton, Ken] 1.e4 King's Pawn Opening 1...e6 French Defense 2.d4 d5 3.Nc3
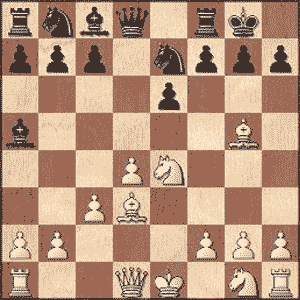
Paulsen Variation 3...dxe4 is the third most played move in this position, one of the main continuations. (3...Bb4 is the main move in this position.; 3...Nf6 is the second most popular.; 3...Nc6 is another frequently used option.; 3...c5 has also been tried quite a few times.) 4.Nxe4 (4.f3 is the only sideline worth talking about here, the textmove is almost always played.) 4...Bb4+ Not a popular move in this position as it gives White a free move. (4...Nd7; 4...Bd7; 4...Nf6; 4...Be7) 5.c3 White gets his pawn chain set with tempo. 5...Ba5 6.Bg5 Ne7 7.Bd3 0-0
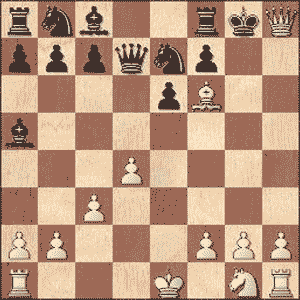
Black gets castled much quicker so his King must be safer than the White King who is still a couple of moves from the sanctuary of the castled stronghold. 8.Nf6+! Suddenly a Kingside attack begins. White is defying some opening principles that we are warned about. He attacks before completing his opening development. He's calculating that Black is not in a position to exploit his defensive vulnerabilities and his own attack will be decisive. Is he right? 8...gxf6 (8...Kh8 9.Qh5 h6 10.Bxh6 g6 11.Qh4 Nf5 12.Bxf5 Qxd4 13.Qxd4 Bxc3+ 14.Qxc3 Nd7 15.Nxd7+ e5 16.Bxf8 b6 17.Qxe5+ f6 18.Qxf6+ Kh7 19.Qg7#) 9.Bxf6 Those White Bishops are looking ferocious with the White Queen ready to join the onslaught. Black's pieces, of which only one is developed, are so far from the coal face and it's looking grim. 9...Qd7?? He wanted to free the pinned Knight but now the end will come quickly. (9...Qd5 would have been better, and after 10.Bxe7 f5 11.Bxf8 Qxg2 12.Qf3 Qxf3 13.Nxf3 Kxf8 14.Ke2 Nd7 15.Rhg1 c6 16.Bc4 Nb6 and White is still up an exchange with a nicer position but Black can fight on for a while.) 10.Bxh7+!! A second sacrifice to obliterate the remains of Black's defense and keep the attack going with speed. This move is obligated by the first sacrifice. He must continue in the same vein as he must win quickly or lose. 10...Kxh7 11.Qh5+ And we see as White saw before the second sacrifice that it is forced # on the next move. 11...Kg8 12.Qh8#
Bringing this explosive attack to a successful conclusion. 1-0 Wall, Bill - Wall, William [C10] P.S. If you do not have html based email software and you're using a text only system, you may find that the links are only partially highlighted and may not work. If this is the case, simply copy and paste the entire link into the browser and hit Enter. That should get you where you want to go. Comments, ideas, feedback? I'd be stoked to hear from you. Get in touch See you next month. Ken 
|
| Back to Back Issues Page |


